Release 2025.13
As of December 16, 2025, all customers on the production version of the Procurios Platform will use release 2025.13. In this blog you can read what is new and what has been improved.

Communities: filter on community activity
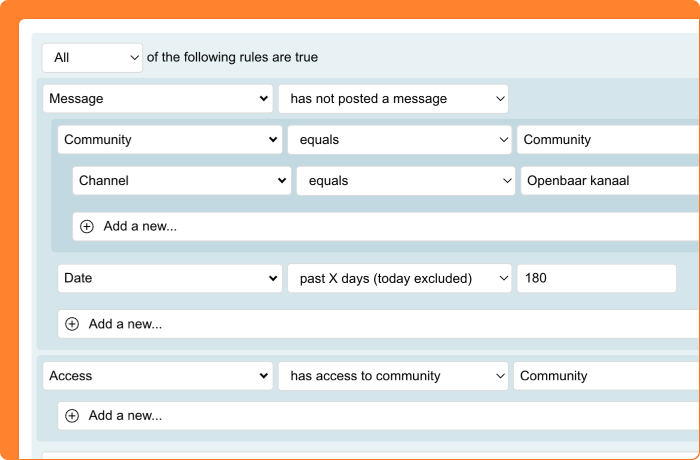
Your organization has set up a community to connect members or donors with each other. But how do you keep track of who's active, who hasn't visited in months, and who might need a little nudge? Until now, it was difficult to get these insights from the CRM.
Starting with this release, you can use expanded filter options for communities in the CRM. These let you search for relations based on their community activity:
- Access: find out who has access to a community or specific channel. Useful for reports and setting journey criteria, without having to manually check the underlying relation lists.
- Posts and reactions: find relations who have posted a message or reaction, optionally filtered by community, channel, or time period.
- Moderator: search for who is a moderator in a community or channel.
- Followers: discover who follows a channel or person, and whether they receive notifications.
A powerful application is the combination with Marketing Automation. Set up a journey that automatically reminds community users after a period of inactivity about the value of their contribution. This way, you keep your community lively without having to manually monitor everyone.
CRM: more reliable invitation for new users
You want to give a new employee, volunteer, or board member access to the platform. Through 'Create user' you send an invitation email with a personal link that allows the recipient to log in directly. Unfortunately, this link didn't always work as expected: sometimes the recipient ended up on a login screen without further instructions, or the link only worked once.
The invitation link has now been made more reliable. The link remains valid for two weeks and can be used multiple times. Additionally, when creating a user, you now receive an immediate notification if the selected website has a login restriction. This prevents someone from receiving an invitation for a website they don't have access rights to.

CRM: prevent unintended newsletter unsubscriptions during automatic deduplication
Sometimes a relation registers again with your organization - for example for an event or a new campaign - while a relation card for this person already exists. Thanks to automatic deduplication, this is neatly merged into one relation card. However, this process can lead to an unwanted problem with newsletter preferences.
Imagine: someone is already receiving your newsletter. When filling in a new form, they see the question 'Do you want to receive our newsletter?' and think: 'I already receive that, so I can skip this checkbox.' They leave the checkbox empty. During deduplication, a conflict now arises: the existing relation card has the checkbox ticked, the new one has it unticked. Which value should be retained? Until now, this could lead to unintended unsubscriptions from the newsletter.
From now on, you have full control over this. When setting up automatic deduplication, you can now choose from three options for checkbox fields (such as newsletter preferences):
- Use the newest or oldest value (as before)
- 'Set checkbox ON' - in case of a conflict, the checkbox will always be ticked
'Set checkbox OFF' - in case of a conflict, the checkbox will always be unticked
By choosing 'Set checkbox ON' for your newsletter preference, you prevent relations from being unintentionally unsubscribed when they fill in a new form and skip the checkbox. This way you retain your newsletter subscribers and prevent missed communication.
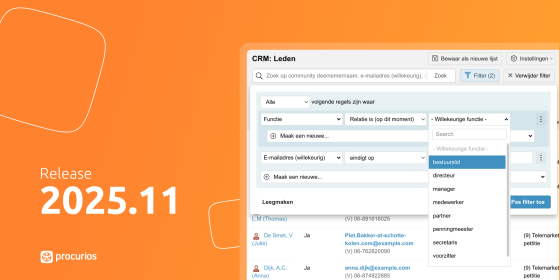
CRM: quickly search on properties like 'member' or 'donor'
Whether someone is a member of your association often depends on multiple criteria. Perhaps they need one of four specific subscription types, OR the 'honorary member' checkbox needs to be ticked, OR they're connected through a role to an employer that pays membership for all employees. Each organisation has its own rules for this.
Until now, you had to rebuild all these criteria in every search query. And on the relation card, you had to check multiple fields each time to see if someone met the definition. Time-consuming and error-prone, especially with complex definitions. From now on, you can use generated properties. You configure once what 'being a member' means for your organisation, and the platform automatically checks for each relation whether they meet these criteria.
Visible on relation cards
Add the property as a field on the relation card. Instead of checking three different places, you immediately see one clear checkbox: is this person a member, yes or no.
Add it to relation lists
You can also add the property as a column in relation lists. This lets you see at a glance whether all relations are active donors, members, or meet any other property. No need to open individual relation cards to check.
Filter directly
What's new is that you can also filter on generated properties. No more complicated filters with ten criteria - just filter on 'is member'. You activate this per relation view under 'Fields from other modules'.
This saves time when building relation lists and ensures everyone in your organisation uses the same definition. No more discussions about who counts as a member.

CMS: randomly sort relation lists on your website
Your website displays an overview of affiliated companies, board members, or ambassadors. By default, these lists are sorted alphabetically. This means organizations with names starting with A always appear at the top, while names beginning with R don't show up until page two. Not exactly fair when you consider that the top positions receive much more attention.
From now on, you can also have relation lists sorted randomly. You choose whether the order changes with each page view, or whether the random order is fixed per day. This way, everyone in your network gets a fair chance at visibility.
This option was already available in the older 'Relation overview (HTML)' article type. Now you can also use random sorting in the newer options: 'Relation overview (website template)' and 'Relation overview (content templates)'.
Finance: choice between letterhead or blank paper for invoice reminders
Your organization sends invoice reminders by post and prints them yourself. For invoices, you could already choose whether to print on letterhead or blank paper. This option was missing for reminders, giving you less flexibility in your printing process.
From now on, you can choose which type of paper to print on when downloading reminders. The choice depends on the settings of the linked invoice template. When downloading multiple reminders at once that use different templates, you can specify per template whether to print on letterhead or blank paper. You can also choose to print everything on blank paper.
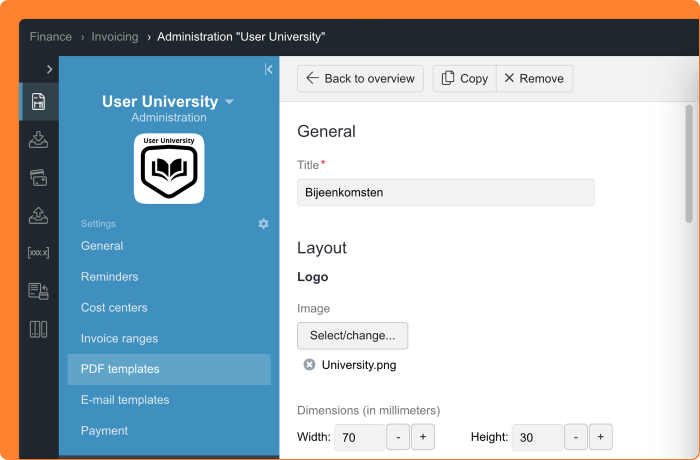
Finance: clearer invoice template editing
When managing your invoicing, you want invoice templates to look exactly the way your organization envisions them. With the recently added formatting options for invoice templates, however, the editing form grew considerably. This meant you had to scroll a lot to see the effect of your changes.
From now on, the editing form for invoice templates has been reorganized. Content and layout are better separated, and the preview remains visible while you edit. This way you can immediately see the result of your changes, without scrolling back and forth.
Read more about the previously added formatting options here
Finance: use your own references in Peppol invoices
Your organization invoices corporate memberships where members provide their own reference, such as a purchase order number or cost center. Or you sell products through the online store where customers can enter a project code. These references are important for the administration of your business customers. When you send invoices via Peppol, you want these references to be visible there as well.
From now on, when sending a Peppol invoice, the invoice reference is automatically included. This means that references entered for subscriptions or online store orders correctly appear in the recipient's Peppol system. If no reference is entered on the invoice, the invoice number is used, as was previously the default.
Meetings & Events: emails and schedule easier to find
When organizing events, it's important that participants receive the correct information. Yet it can happen that an email is accidentally sent with outdated details, for example because the email still contained information from a previous event. This causes confusion among your participants.
To prevent this, important settings for your event are now easier to find. The 'Schedule' and 'E-mails' tabs were previously somewhat hidden under 'Settings', but now have their own place in the menu. This gives you quicker access to these fundamental parts of your event.
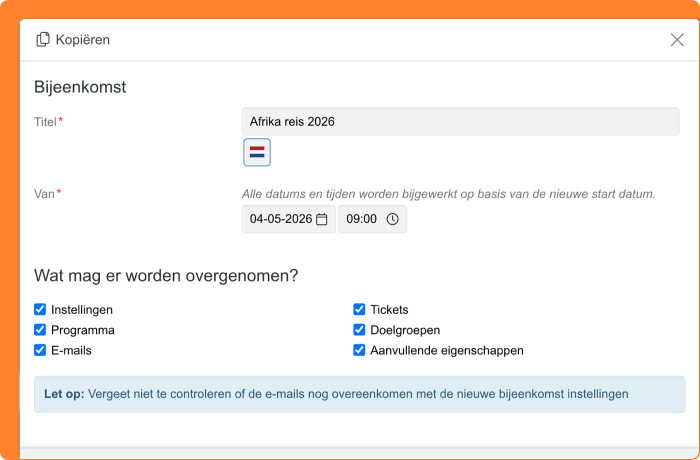
Are you copying an existing event as a basis for a new one? A notification now appears when you copy the emails as well. This reminder prompts you to review and update the email texts for the new event.
Meetings & Events/CMS: display multiple departments in event overviews
Your organization works with local departments that each organize their own events. On a regional or provincial website, you want to display all events from the underlying departments in one overview. Until now, you could only show activities from one specific department in the event overview.
From now on, you can select multiple departments in the event overview. This way, you can show all events from the departments within a province on your provincial website, for example.
Additionally, you can now choose to display the organizing department to visitors. This works both in the overview and on the event detail page. This option is immediately available in Sapphire templates. Using a different template? Your web administrator can implement this.
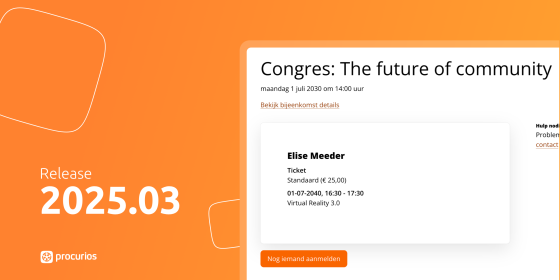
Meetings & Events: personal activity list in emails and proof of presence
At your events, participants can register for specific activities within the programme. Think of choosing a workshop during a workshop round or selecting a session when multiple options take place simultaneously. You want to send them a confirmation email clearly stating which activities they have chosen. When issuing certificates of attendance afterwards, it's also useful to mention which components someone participated in.
From now on, you can use a field code that automatically generates a personal list of all activities a participant is attending – including activities that required registration. This way, each participant immediately receives a clear and personal programme overview in confirmation emails, reminder emails and certificates of attendance.
Meetings & Events: set ticket availability down to the minute
Sometimes you want an early bird discount to end at exactly 12:00 PM, or tickets for an exclusive presale to become available at 10:00 AM. For 'Available from' and 'Available until', you can now set a specific time in addition to the date.
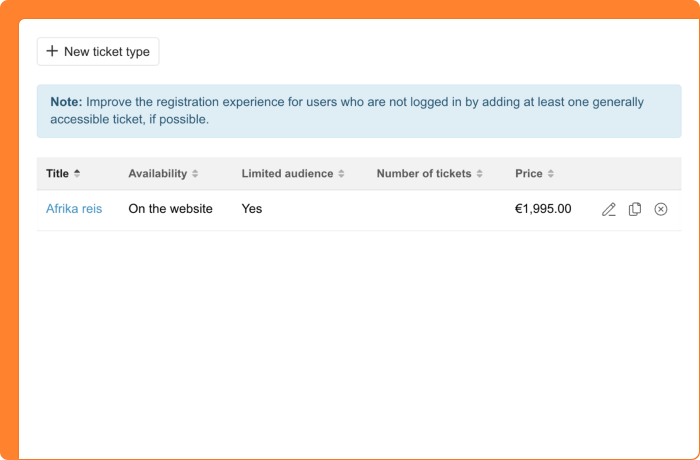
Meetings & Events: work faster with tickets thanks to copying and searching
When organizing events with multiple ticket types, managing them can be time-consuming. Especially when you have tickets with similar settings, or when you need to search through a long list of ticket types.
You can now copy tickets, making it faster to create new ticket types with similar settings. A search field has also been added so you can quickly find the right ticket. The ticket overview now displays extra information per ticket type as well: availability, whether there's a target audience restriction, and the number of tickets configured.
If you've only set up tickets with a restriction (for example, only available with a ticket code or for a specific target audience), a notification will appear. By always adding at least one ticket that's visible to everyone, you prevent non-logged-in visitors from getting the impression that no tickets are available.
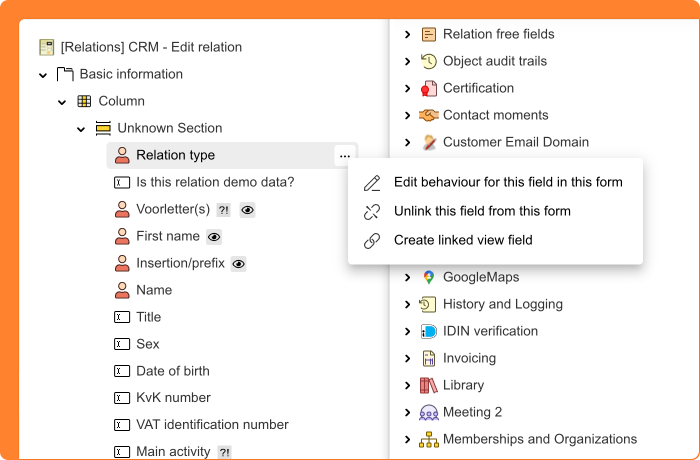
Platform: additional options easier to find
Your organization works in the platform every day. In many places, additional actions are available, but these were only visible by right-clicking. Think of setting a focus point for an image in Library, editing a field in a CRM form, or adjusting a page in the CMS. Useful for those who know, but difficult to discover for new colleagues.
From now on, a button with three dots ('...') appears in all these places when you hover over an item. Click on it and you see all available actions for that item. Right-clicking still works as you are used to, but the dots make it clear to everyone that more options are available.
This makes it much easier to help new staff members find their way around the platform.
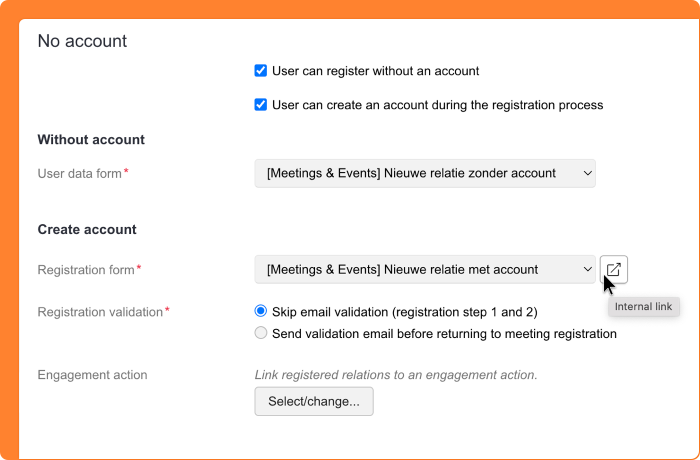
Platform: quickly navigate to linked items
When managing meetings, forms, or documents in the platform, you often encounter linked items. A form configured for a meeting, an image from the Library, or a relation list selected somewhere. But where can you find that item when you want to view or edit it?
From now on, a convenient navigation icon appears in more and more selection fields. When you hover over a selected item, you'll see a button that takes you directly to that item. For dropdown lists, the icon appears next to the field and opens the current selection. For 'Select/change…' buttons with multiple items, you can click through to each item individually.
This feature is now available for meetings, the collection picker, and the document picker, among others. In the coming weeks, this will be extended to many more places throughout the platform.